Translation of Segments
We are getting to the primary purpose of the Workbench, which is of course, translation of text. In this section, we’ll talk about the different ways of doing that.
It bears mentioning right off the bat that the Workbench is not meant to selfishly yank you out of your CAT tool of choice. As the proxy supports exporting segments in the industry-standard XLIFF format, you can always employ any tool of you preference, SDL Trados and MemoQ, for example, being two major players in the field. The choice is yours.
Nevertheless, you will find that the Workbench is closer to where the website really is - up there in the cloud, and therefore immensely useful during the editing process. You’ll see it truly begins to shine when your XLIFF files have done their first round-trip to and from external CAT tools.
There are multiple ways of translating content on the Workbench:
manual Translation using the Target editor
using Translation Memories
using Machine Translation
importing translated XLIFF files
The following sections provide an overview of the translation methods listed above.
Editing segments
Editing of segments happens in the Target editor located on the bottom of the Workbench:

You can use the Highlight View or the List View to select a segment, and the editor will reflect your selection. The Source entry is displayed to the left, the translation (Target) to the right. Only the target is editable.
Editing Window
Editing translations on the Web means going around/avoiding/leaving intact the forest of HTML tags that the text os usually embedded on. The Workbench abstracts away these markup details to ease working with text (the first and foremost task of translators), but doesn’t, and will never attempt to hide the fact of their existence.
Tags are represented as numbered grey widgets around certain parts of the text, which you can use as a yardstick to place your translations in the appropriate tag context without having to worry about what those tags actually do.
Two things:
You can Drag & Drop the Numbered Tags
You can NOT delete them
Adding translations is otherwise straightforward text input. Untranslated entries will contain the Source text as a placeholder until such time as a change is made to the contents of the Target, at which point both the List View and the Segment contents are updated.
There are a few smaller buttons in various parts of the Target editor. In the middle, you’ll see these three buttons:
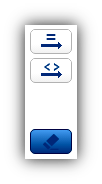
These contain editing functions that relate the contents of the Source and the Target in different ways. Use the top “Equal” button to copy the Source contents to the Target, rendering them identical. You can use the middle, “Tag” button to copy the tag structure of the Source to the Target. The lower “Eraser” button will delete the translation and restore the placeholder.
There is another set of four buttons to the right:
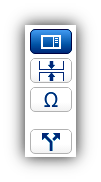
They all deal with the Target. In descending order, these are:
Toggle sidebar: use this to hide the Suggestions & History sidebar above the button.
Preserve Whitespace: prevent trimming of whitespaces in the segment
Insert non-printing characters There are a number of non-printing characters you might need during a translation project, especially if you are dealing with languages that have a Right-to-Left writing direction, such as Arabic. See the section on RTL conversion for further details.
Split segment from group
Saving changes
Click on “Save & Next” to save your work on the given Entry and jump to the next segment. You can also use Ctrl+Up or Ctrl+Down to do this. This is an explicit, although not strictly necessary action, as any edits are automatically saved upon leaving a page, or otherwise after 60 seconds of inactivity on the Workbench. Any navigation generated by the Workbench itself will also trigger a flush of all unsaved segments.
Automatic Translation
There are a number of Auto-translation features that you can employ to ensure quality on the proxy.
The option to run pre-translation or set it up to run automatically is also available on the Dashboard. Here, we discuss the options available after clicking on the “Pre-translate” icon in the toolbar:
![]()
The following dialog is displayed:
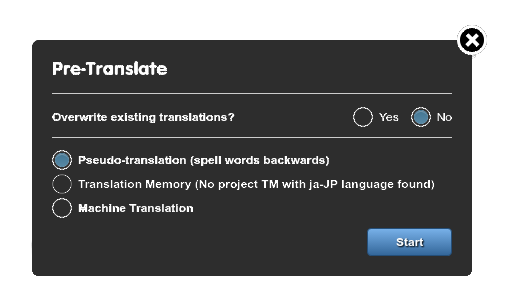
Pseudo-translation
This function is admittedly not translation in a meaningful sense, but string-reversing each and every word of every segment on the spot is very effective during a demo. Use it, then go to Preview to demonstrate to the client that website localization is as painless as using CAT tools in tandem with the Proxy. Good for the wow!-factor. You can also use pseudo-translation to test the various editing features available on the Dashboard and the Workbench.
Translation Memory
If you have a populated Translation Memory on a project, you may use its contents to translate segments. Use this feature to translate your content with a preset match threshold.
Machine Translation
You can choose to Machine Translate the currently selected batch of entries using one of the available MT APIs (Google Translate, Bing Translate, iTranslate4u and GeoFluent).
Translation Memory and Machine pre-translation are both reproductions of the options accessible on the Dashboard, with the added functionality of being able to control which specific group of segments should be targeted by the process.
Search & Replace
The Workbench has a Search & Replace feature you can access by clicking on this icon in List View:
![]()
It always operates on the currently listed set (or subset) of editable segments. The dialog that opens will look like this:

Both ‘Search in target’ and ‘Replace in target’ values are required, while ‘Filter by source’ is optional. You can use either simple strings or regular expressions as search terms (simple strings are the default, check the ‘Regex’ option next to the field to use a regular expression). The function is case-sensitive.
Choose ‘Test run (no changes will be made)’ to check how the operation would affect your translation. To see the entries affected by replacement, check the ‘Preview changes on a few segments first’; the segments will appear in the Preview area (Preview can’t be used without Test run). You can also start replacement right away, without preliminary checking.
Once the operation is ready, you will receive an e-mail notification with a detailed report on the entries affected.
Please note that the replacement is done in the database, not in the TM. If you want your TM to reflect these changes, you need to run ‘Populate TM’ from the Dashboard.
Keep in mind that the operation cannot be undone!
History
The proxy keeps tabs on what happens to each Entry in the project timeline, and the Workbench displays these tabs in the sidebar. You can use these to access previous editing states of an Entry. Here follows a short description of the History functionality.
Translation Memories
If you select a segment, TM suggestions will be displayed for it in the sidebar tab labeled “Suggestions”. Click on any one of them to add it as a translation for the given Entry.
A Search field is also provided that you can use for concordance lookups.
Segment History
Whether a result of a manual or an automatic edit, each saved state of an Entry will be saved with a username and a timestamp in the Entry history. You can access it in the sidebar tab labeled “History”.
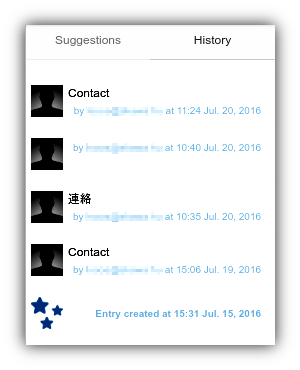
This means you don’t have to worry about ever losing translated content as a result of manual edits - you can always restore a previous state of an Entry by selecting the Entry in List View or Highlight View, going to History and copy & pasting a previous state of your choosing.