Per-language settings
In this menu, you are provided with the means of publishing your website on a pretty domain after translation tasks have finished.
The publish wizard has two options to make the site available to the web at large: serving domain mode and subdirectory publishing mode.
Domain settings
This screen opens by default after clicking on a Target locale in your list. Details of the locale and some settings are here:
Target language
Temporary domain: Similar to the Preview but works like the live site (useful if you have different snapshots). Used for Subdirectory publishing.
Status: Lets you know when the locale isn’t published yet.
Live domain: If the locale is published it lets you know the domain.
Translation path prefixes: When you publish in Subdirectory mode, the content is on the same domain as the source. As such the crawler may visit it and ingest the translated content as source. You can prevent this by entering the path prefixes that contain the translations here. They will be excluded from the project.
Serving mode: Subdomain or subdirectory.
Override HTML lang attribute: Every HTML page has an attribute that specifies the language of the document. By default, this is set to the locale code (like
en-GB). It’s advised by the W3 to “keep the tag as short as possible. Avoid region, script or other subtags except where they add useful distinguishing information”. To follow this advice, you can override the default using this field.
There are 3 tabs – ACCESS CONTROL, PUBLISH WIZARD, and SETTINGS – full of additional settings available as well:
Access control
You can add basic HTTP authentication to the proxied site in order to restrict access to it. Select the proxy modes that you’d like to limit access to and add a user by entering a username and password. You can add multiple users to the list. Press the SAVE CHANGES button when you have finished.
Publish wizard
Under this menu, you will be able to publish your website either in Serving domain mode or Subdirectory publishing mode.
STEP 1 - Serving domain
As a first step, you need to provide the domain name on which the translated website is to be published.
The proxy will only publish a project on one domain name at a time, that is, a project with the same target language will not be available on naked domain (example.com) and subdomain (www.example.com) at the same time. Additionally, each domain can only host one language of a single project at a time, meaning if you have several variants of a language, each will require its own domain (e.g.: enus.example.com, enca.example.com and enuk.example.com) to serve them respectively. You need to set up server-side redirection to the “main” domain (best practice prefers the HTTP301 MOVED PERMANENTLY status code with the Location header).
STEP 2 - Path
In this second step you need to add the path prefix(es) in which you plan to publish this project language. Path prefixes have to start and end with a slash (/), and you can add multiple path prefixes by separating them with a comma (,). These prefixes will be excluded by the proxy & crawl.
STEP 3 - Publishing mode
Subdirectory publishing (example.com/fr)
The alternative to subdomain-based publishing is to retain your own domain and publish the site as a subdirectory. I.e. the translated pages will appear under separate paths under the same domain as the one the project was created for (the original domain).
Due to the way the proxy works, this requires a reverse proxy configuration to be placed in front of the web server. A variety of load balancer/reverse proxy solutions are available on the market, with nginx, CloudFlare and AWS CloudFront being three of the most well-known solutions. See the vendor documentation for the details of setting up a reverse proxy (do note that nowadays, reverse proxies are monumentally powerful network solutions, and discussion of all their features is beyond the scope of this introductory description).
Javascript publishing (former Client-side translation)
In case of Subdirectory publishing, you are directed to Step 4 CDN / REVERSE PROXY and then to STEP 5 SUMMARY.
Custom domain (via CNAME/TXT DNS records)
In the serving domain mode, the translation proxy will publish the translated site either on a subdomain of the original (the default behaviour, such as fr.example.com), or on a completely separate naked domain (such as example-fr.com). In order to use this mode, you (or the client) will have to modify the DNS settings corresponding to the original domain - the four to ten records (four for subdomains, up to ten for new naked domains) that need to be inserted in your DNS settings are found under the Verification menu. These records will change as you enter or change the desired serving domain in the first step called Serving domain. They also change depending on the user who is currently logged in. On projects with multiple users, only the user who first got the record can finish publishing.
In the case of Custom domain you are directed to STEP 4 VERIFICATION.
STEP 4 [Selected publishing mode: Custom domain] - Verification
There are four CNAME settings that are required on your domain to enable publishing of your website. Each of the lines in the table that is displayed has a specific function:
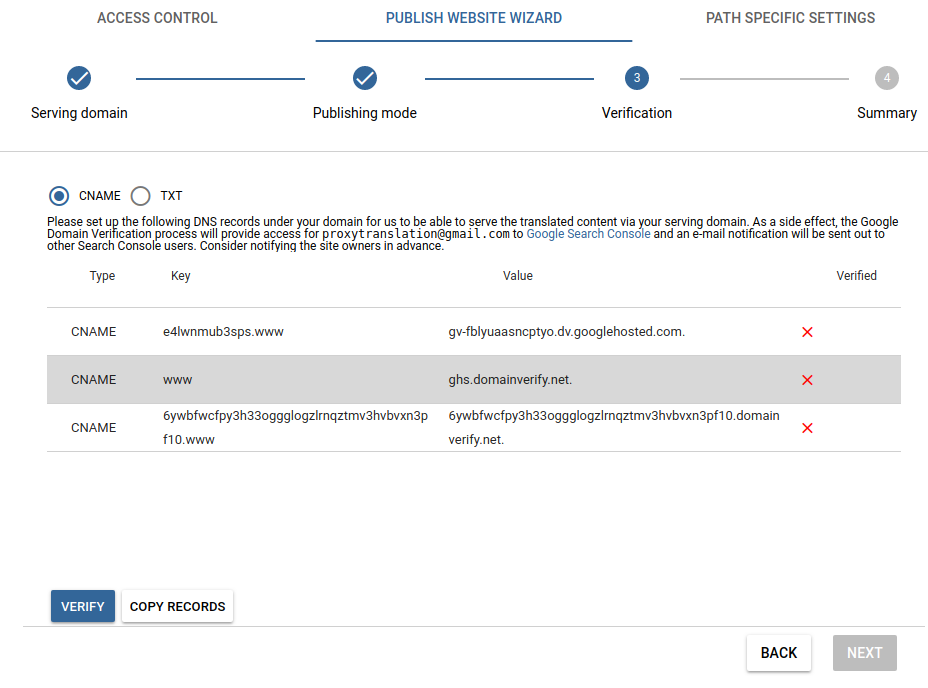
CNAME 1 Allows mapping of the subdomain in Google AppEngine, enabling us to alter the datastream and translate the site. This row is computed from the serving domain entered in the first step called Serving domain, and needs to be added once per serving domain.
CNAME 2 Allows mapping of the naked domain in Google AppEngine enabling us to alter the datastream and translate the site. Either this or the previous record is required. We recommend adding both.
CNAME 3 The third line determines where the currently selected target language will be published. This defaults to the language code, but you are not obligated to keep it that way. This has to be entered separately for every target language you publish.
CNAME 4 The fourth line verifies ownership of the original domain. This is computed from the user’s ID who is currently looking at the publishing page (i.e. different users will see different values, so one person should communicate this to the client and hit the Verify button), and needs to be added only once per serving domain as well. You can set the subdomain and domain where the translated site will appear.
These may appear in a different order.
After all the settings have been entered into the DNS records, there is short time while the changes propagate and are replicated across the world. This can vary wildly with the DNS and hosting providers, taking anywhere between one and twenty-four hours. It is recommended to wait out the twenty-four hours, as you will not be able to click on the Next button until all checks are passed.
HTTPS & SSL certificates
Additionally, if the original site was HTTPS, or the translated sites will be served over a secure channel, an appropriate certificate and its associated key will also be needed. Ideally a wildcard certificate (one certificate for all subdomain), but Extended Validation certificates can also be used, although they require more setup work.
Our support team can also provide you with the Certificate Signing Requests necessary for the generation of these certificates - this will also have the added benefit of not having to send the private keys over the wider web for recording in AppEngine.
Additionally, we have a Managed Certificate program, where the proxy handles SSL certification automatically for published websites. The Managed Certificate program has a cost of € 50 ($ 60)/proxied domain/year or € 100 ($ 120)/proxied domain/three years or € 500 ($ 600)/proxied domain/project lifetime.
See the pertaining section of the documentation here.
STEP 4 [Selected publishing mode: Subdirectory publishing] - CDN / Reverse proxy
We tried to provide you with the absolute minimum example configurations required to achieve a workable reverse proxy using five popular web server/CDN systems. See the integration guide for them below:
Microsoft IIS
Apache HTTPD
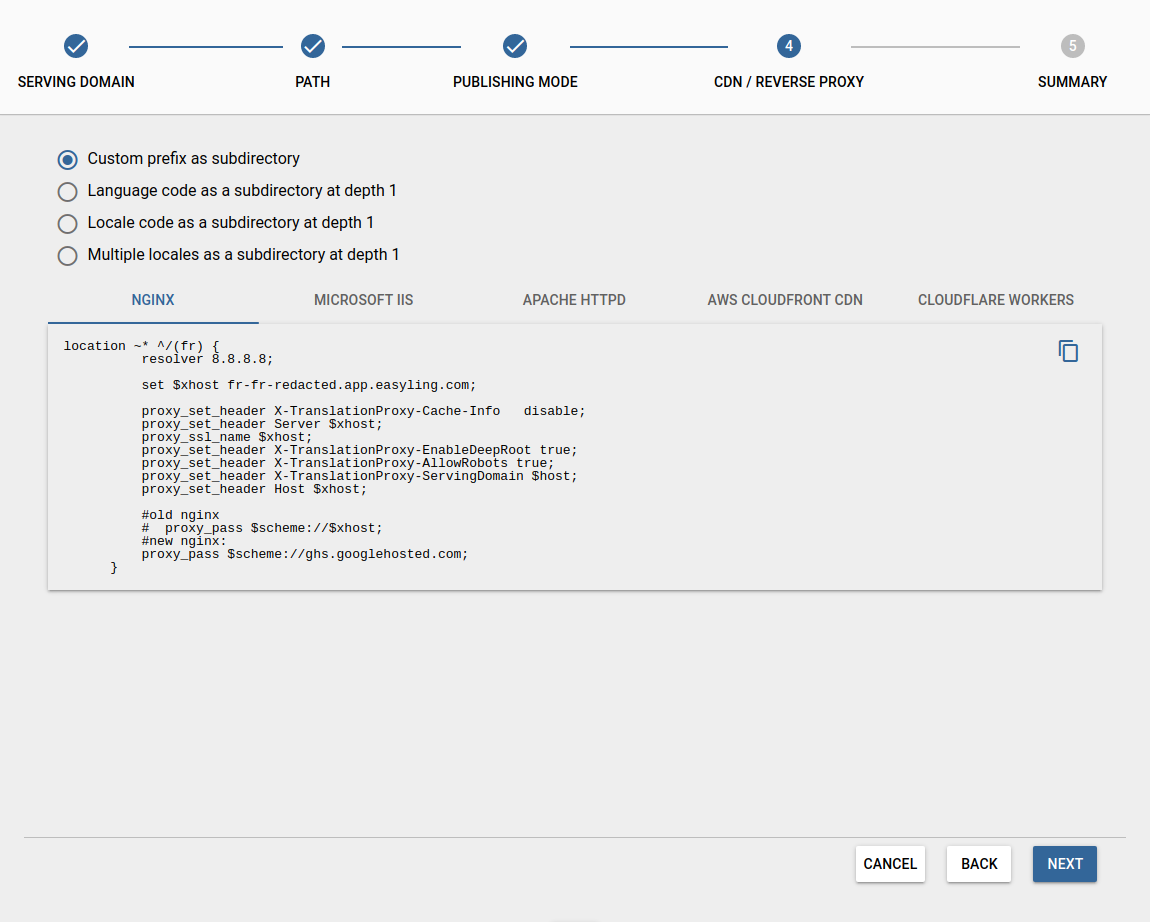
If you select an option, for example Multiple locales as a subdirectory at depth 1, it will only show you a different configuration as an example, but as we wrote previously, you need to set up your own reverse proxy or CDN, configured appropriately. You can also set up path prefix rules under the menu Path Specific Settings, and we will discuss these configuration options later.
The goal of any reverse proxy configuration interoperating with a translation proxy domain requires that its configuration reflect the intent of the configuration examples.
Let’s clarify these snippets with a more general, high-level explanation of a reverse proxy in operation.
Example:
Suppose that we know the following about a translation project about to be published using a reverse proxy.
The origin server domain is
www.example.com.Source language is English.
Translation exists for German
German serving domain:
de-de-gereblye.app.proxytranslation.com
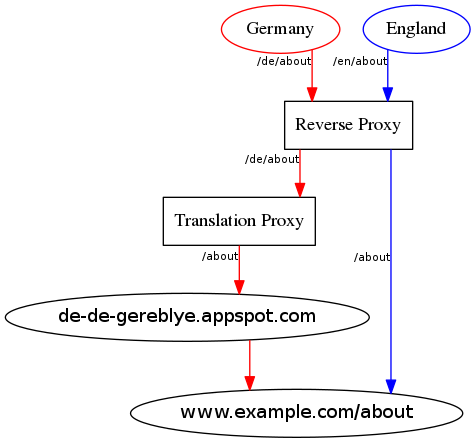
The task of the reverse proxy, standing right at the beginning of the pipeline that will serve a client request, is to decide which target language is requested by the user and to ensure that the request is relayed to the appropriate domain that can respond with content in the appropriate language.
In our example scenario, the reverse proxy has to make one decision: is the user requesting a resource in English or in German?
Translation proxy
From our perspective, the most interesting case is when a user from Germany requests www.example.com/de/about, the reverse proxy decides that the target language should be served via Translation proxy. It relays the request to the Google Cloud, where it is resolved to what we call the temporary serving domain, defined as de-de-gereblye.app.proxytranslation.com. In the serving subdomain mode, this domain is hidden from the user by the DNS settings added. In subdirectory publishing, the reverse proxy hides the temporary domain.
You can see that de-de-gereblye.app.proxytranslation.com will – same as with subdomain publishing – relay the request and all necessary request headers to the origin server, which will respond accordingly with source language content that the Proxy then processes on the way back and sends long to the client in a translated form.
Setting aside the exact details of that cloud translation pipeline, that’s about it.
Source language request
Requesting the original content is a relatively straightforward process that we should nevertheless describe in brief for the sake of completeness.
If a user in England requests www.example.com/en/about, the reverse proxy strips the /en prefix, decides on the language to be served and relays the request to the origin server.
In this case, there is no more proxy mediation (that is, no Translation Proxy) between the origin server and the requesting client, so the server response is returned and the user can peruse the webpage in the original language.
Note that on the origin server, the /en prefix does not exist as part of the directory structure - it is a virtual prefix used by the reverse proxy to dispatch to different domains based on the target language.
If the origin server is capable of providing content in more than one target languages, the reverse proxy should presumably do the same thing for each of those target languages. If a request for www.example.com/de/about can be fulfilled by the origin server alone, the reverse proxy will relay that request straight to the origin server (where it is assumed that the server backend will make the decision based on the HTTP request headers received).
STEP 4 - Summary
After configuring your publishing mode, in this last step, you will see a short summary. By clicking on the PUBLISH button, you need to accept all of the options in the Disclaimer popup in order to be able to publish your translated website.
If the publishing is successful, then the serving domain name will appear in the Live domain column.
Deactivate / Delete
There are two different options for disabling the translation, and based on the selected publishing mode, you can choose either Deactivate or Delete.
Deactivate [Selected publishing mode: Serving domain]: In this case, the related entities from our database will be removed, and it would make an error page appear when the translations are requested, which means that the publishing is disabled by our side. When you select this option, the serving domain name will be visible under the column called Verified domain. Alternatively, if you or your client removes the DNS records relating to the projects (especially the ghs.domainverify.net or ghs.googlehosted.com records), the requests will no longer reach the proxy, and translations will cease to be served.
Delete [Selected publishing mode: Subdirectory publishing]: Removing the target locale will disable the translated website and make all the translated segments disappear. However, translations are retained in case of deleted languages as well, which means that the language can be re-added and the translations will be immediately available.
Settings
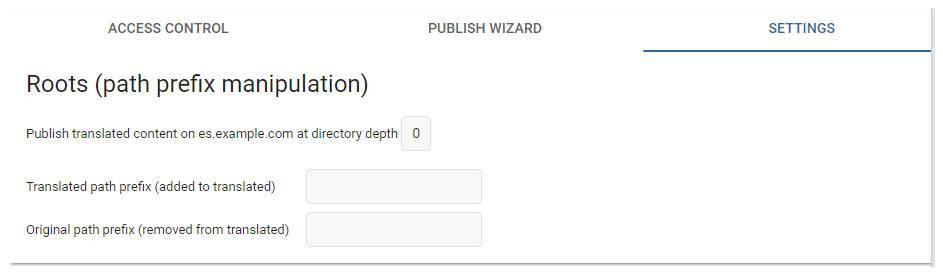
Roots (path prefix manipulation)
We gathered below a few examples for you, in order to show you the behaviour of these configurations.
Publish translated content on www.example.com at directory depth 1
If your publishing mode is subdirectory publishing, then this value will change automatically from 0 to 1.
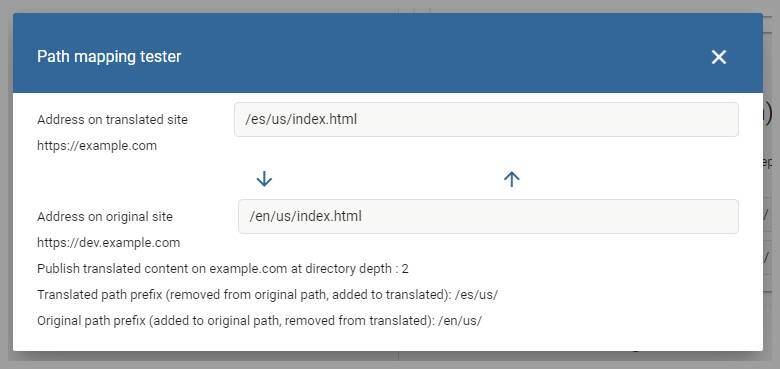
Translated path prefix (removed from original path, added to translated) /en/
Removed from original path means that the original / remote server will never receive this path prefix, it will be visible only in the client translated URL, as you can see below:
However, be aware that the directory depth number will increase according to the number of path prefix you describe in this field:
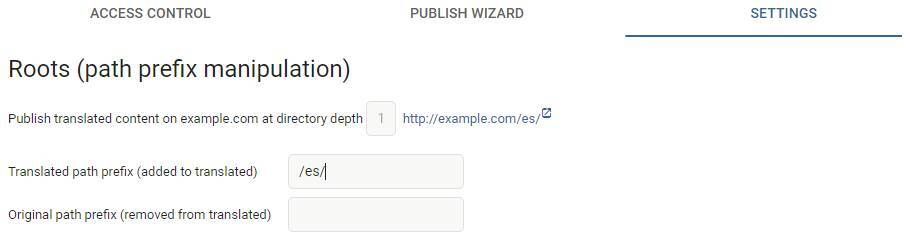
Original path prefix (added to original path, removed from translated) /en/
Using together Translated and Original path prefix options, they can be used to swap the root element of the link:
Path segment translation
With this option, you will be able to add paths segments (words between two forward slashes) here to translate them. You are limited to 50 entries at any time, but these will be translated wherever they occur, for example:
www.example.com/example --> www.example.com/translation

www.example.com/notexample/nottranlated/example/text --> www.example.com/notexample/nottranlated/translation/text